Recording Basics
There are many recording techniques you can use to achieve different sounds. Mic choice, mic placement, and room acoustics can all greatly influence the final recording. You should always aim to capture the best possible sound at the source, rather than relying on fixing problems during mixing. Even major issues like harsh tones, low volume, or other mix problems can often be addressed during recording. For example, if an instrument sounds harsh, try switching from a condenser to a dynamic microphone, as dynamic mics typically have a less detailed high end. This can reduce unwanted brightness, saving you from needing to EQ it later.
Gain Staging
Whenever you're working with audio, it's essential to have proper gain staging. In simple terms, gain staging means ensuring your audio signal doesn't clip at any point in the signal chain.
The most important time to prevent clipping is during the recording process. Always test the instrument at its loudest point and adjust the input levels accordingly. Ensuring the signal doesn't peak or clip is crucial—you don't want a great performance ruined by poor recording settings. If you absolutely must recover a clipped recording, tools like iZotope RX's De-clip module can help. But ideally, clipping should be avoided entirely at the source.
While clipping is undesirable, recording too quietly also introduces problems. All recordings contain some background or electrical noise. If the performance is recorded too softly and later amplified, you'll also amplify this noise. This is known as the noise floor. You always want a strong signal-to-noise ratio, meaning the recorded signal should be much louder than the noise floor.
Mono Vs Stereo
When recording live instruments, you'll most often capture them in mono (using a single microphone). To record in stereo, you need two microphones placed at an equal distance from the sound source to avoid phase issues.
Choosing between mono and stereo is a creative decision. For a wide stereo image, use a stereo pair. For a more focused sound with less room ambience, a mono setup is usually better.
The more techniques you learn, the better your decisions will be when recording. Choosing the right microphone, placement, and approach for each instrument, room, or performance takes experience. While simply pointing a mic at an instrument may work, refining your method leads to far better results.
Mono Recording
Even with a single microphone, there are many factors to consider for the best outcome. The mic type, angle, and placement all significantly affect the sound.
Close Mic
Close miking typically places the mic within 20–50 cm of the sound source. This captures more detail and reduces room reflections. Transients will sound crisper, and the tone more direct. Be aware of the proximity effect (explained in the Microphones chapter)—this boosts bass frequencies when the mic is close. You can use this to your advantage when you want more low end, or pull the mic back to reduce it.
Off-Axis Mic
Off-axis miking is a variation of close miking. Instead of pointing the mic directly at the sound source, you angle it slightly away. This can subtly alter the tonal balance, often softening harsh high frequencies. The exact effect depends on the mic's polar pattern and other factors.
Room Mic
Room mics are great for capturing the ambience of the environment. They add natural reverb and space, bringing life and energy to your recording. Typically, room mics are used in addition to close mics, giving you control over how much space is blended in.
Room mics are often omnidirectional or figure-8, but there are no strict rules—feel free to experiment.
Stereo Recording
Stereo recording offers more creative possibilities and a greater sense of space and realism. Since people hear with two ears, using two microphones intuitively captures a more lifelike image. You can even use dummy heads with microphones placed in artificial ears for a technique called binaural recording. However, binaural audio is mostly effective when listening through headphones, so it's not commonly used for music production.
X-Y (Coincident Pair)
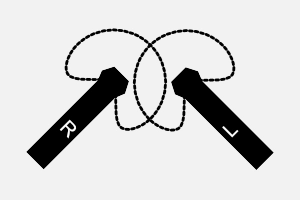
X-Y stereo pairs are one of the most popular techniques for capturing stereo sound. They're easy to set up and produce a strong stereo image with minimal phase or timing issues. The stereo field is somewhat narrow, but the center remains focused and clear.
As shown in the diagram, position two microphones at a 90° angle to each other. The left mic captures the right side of the sound field and vice versa. You can place the mic capsules as close together as possible—even touching—to improve phase coherence and center clarity. Any polar pattern can be used, though cardioid is the most common.
A-B (Spaced Pair)
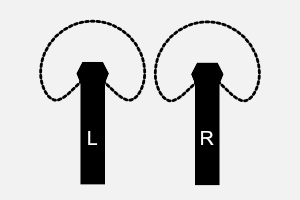
A-B stereo pairs are another common technique, frequently used for live recordings or orchestral setups. This method can produce a wide stereo image, but because the microphones are spaced apart, it's more prone to phase issues and imbalance caused by timing differences.
To set up, place two microphones parallel and facing the sound source. They can be as close as 30 cm apart, but you can increase the spacing as desired. The wider the spacing, the broader the stereo image—but the greater the chance of phase problems. Mic stand attachments are available to help maintain consistent spacing.
ORTF (Near-Coincident Pair)
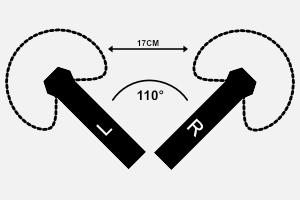
The ORTF technique was developed by the Office de Radiodiffusion Télévision Française, which is where the name comes from. This setup was designed to deliver a natural stereo image that closely resembles human hearing.
To set up an ORTF pair, use two cardioid microphones placed 17 cm apart and angled 110° from each other. It's an excellent choice for field recordings, classical music, or whenever you want a spacious stereo image with minimal phase issues.